Okay, I got to admit I absolutely love bacon. As one comedian I saw on Last Comic Standing once put it “I’m Jewish, but I eat bacon, because no religion is worth giving up the finest meat known to man.”
I’m not Jewish, but I thought that was really funny. My former business partner is Jewish, and he loves bacon (and all things pork, to be sure). I am half Iranian, with a large Muslim contingency in my family, and they all eat bacon. Let’s face it...bacon is the meat equivalent of sex - maybe even better, because you can enjoy it in public without turning too many heads (except, of course, in Iran or Israel).
There I go off on one of my tangents again. Anywhoo...
I was thrilled to get an invitation to submit a post for the Foodbuzz BACONALIA challenge for a chance to win a $500 prize. It finally prompted me to tell my story.
After enjoying decades of bacony bliss, one day I decided it was time to try my hand at making my own bacon. I have no problem with all the great bacon you can get in your local grocery store. All bacon is good bacon, if you ask me. Once again, bacon is like sex. When it’s good, it’s great, and when it’s bad...it’ still pretty good.
Nonetheless, I am the same guy who decided that making my own Worcestershire Sauce was one of those “must do” cooking things, so how could I possibly go through life without curing and smoking my own pork belly? I don’t need that sort of regret in my life!
I set out to make my own bacon, and I immediately hit a wall. All the recipes I looked up called for curing salts, which is essentially sodium nitrates and nitrites in various combinations with table salt. There are a couple of issues with this. One is that it is not readily available everywhere you go, and the other is that it is fairly toxic and apparently carcinogenic when heated to high temperatures (such as when cooking). Being someone who likes to keep toxic materials out of my kitchen whenever possible, I was not too excited to get my hands on any of this.
Yet we have a bit of quandary. The curing salts are needed for two reasons. One is for preserving the meat and preventing botulism (never a good thing...unless you are trying to fix crows feet on your face), and the other is for transforming the pork belly into what we know as bacon. Anyone who has cooked pork belly before knows that, while it is quite delicious, it is NOT bacon. Without the curing process, pork belly does not go through the transformation that changes the flavor and texture to what we know and love. My hopes for home curing seemed to be dashed...or so it seemed.
I was shopping at my local Trader Joe’s one day, and saw something peculiar. It was a package of bacon that was labeled as uncured. This was a bit misleading, since it was indeed cured, but it was not cured with the use of curing salts...at least not in the traditional sense. A bit of review of the ingredients revealed that they had used celery powder as a curing salt. Yes, the very same celery we all enjoy with our chicken wings and blue cheese dressing.
This lead me to do a bit of research, and I discovered that celery (and other vegetables) contain natural nitrites. The nitrites found in vegetables are no less toxic than they are in concentrated form, except they are considerably less concentrated. In fact, further research led me to understand that the concentrated nitrites taken from celery are just as bad for you as the synthetic ones.
However....
I buy celery all the time. It is easy to get, and I (and my children) would have to eat a lot of celery to go through any sort of toxic effect from the nitrites (or so I have heard). I also do not feel nervous about having it around my house. The curing salts I have seen are colored pink to avoid confusing it with table salt. That is all good and well, but my 4 year old daughter loves pink, and will eat anything if it is pink (even if it is not food), so I do not feel comfortable having this around my house. If she chooses to go all out on the celery, I am okay with that.
So I decided that I would try using celery to cure my pork belly. I was not sure how to do that, but I was suddenly inspired. I got some celery, and then I ran into another wall. Pork bellies are not readily available at my local standard grocery store (unless, of course, you buy them as cured bacon). Argggggh!
Then something wonderful happened. A large Asian supermarket (Ranch 99) opened up nearby. As I perused the various interesting meat products and by-products, I spotted a nice pile of pork bellies in the meat case. I immediately purchased one of them (about 3 pounds) and darted over to the produce section for a large stalk (bunch) of celery. Interestingly enough, this market also had bottles of the pink curing salt, but I was having none of that. I was on a mission to do this MacGyver style.
Okay, enough chit chat. Here is how I went about curing my first bacon:
Naturally Cured Bacon
Note: This uses both a wet and a dry cure. It is very important to keep your work area, hands, and everything clean. The pork belly will cure for many days, and introducing pathogens into the process could lead to illness. The gin gives the bacon a nice flavor as well as helps keep the bacteria count down. You can substitute brown sugar or maple sugar for the maple syrup (only use REAL maple syrup). If you do not have any seasoned salt, make some up by making a combination that is half table salt and half paprika, onion powder, garlic powder, and whatever dried herbs you like (thyme, rosemary, sage, bay leaf). This bacon will be a bit salty, which is meant to keep it bacteria free. If you want it a bit less salty, soak it in water for about an hour or two (under refrigeration) before allowing the pellicle to form. 1 each Pork Belly (about 3 pounds) Wet Cure: 1 stalk (bunch) Celery 2 Tablespoons Kosher Salt 1/4 cup Gin 1/2 cup Maple Syrup Dry Cure: 2 teaspoons Black Pepper (freshly milled) 1 Tablespoon Seasoned Salt 1 Tablespoon Smoked Salt (or any Kosher Salt) 2 Tablespoons Brown Sugar 2 Tablespoons Maple Sugar (or more Brown Sugar) • Combine the Wet Cure ingredients in a food processor and puree until liquid. • Put the Pork Belly in a large Ziploc bag and pour the Wet Cure ingredients in the bag and seal it (remove all the air you can). • Let this sit in a shallow dish in your refrigerator for 4 days. • Drain off the Wet Cure and rinse the Pork Belly. • Rub the Dry Cure ingredients on the Pork Belly and put it in another Ziploc bag. Let this sit in the refrigerator for 1 week. Every day turn it over and drain off any liquids that gather in the bag. •At the end of the week remove the Pork Belly from the bag and rinse it off. If you want it to be less salty when finished, soak it in cold water for 1 or 2 hours and drain the water. • Pat the Pork Belly dry and let this sit on a plate, uncovered, in the refrigerator overnight so that it dries and forms a pellicle. • Smoke in a smoker at no more than 240 degrees Fahrenheit for 2 hours. • Let this cool to room temperature and peel off the hide. Save the hide in your freezer for cooking with beans or collard greens, or soups. It is very flavorful and makes a great seasoning. • Chill the bacon overnight and slice about 1/8 inch thick and use as you would any other bacon. It is easier to slice this if you freeze it until it is about half frozen. The first time I made this, I served it with some Banana Waffles for Sunday breakfast:
Banana Waffles
Yield: 12 Waffles Note: For best results use bananas that are ripe until they turn almost black on the outside. They have much more banana flavor then. 3 1/2 cups All-Purpose Flour 1/4 cup Granulated Sugar 2 teaspoons Baking Powder 1/2 teaspoon Baking Soda 3/4 teaspoon Salt 5 each Large Eggs (separated) 1 3/4 cups Milk 1 cup Buttermilk 3/4 cup Melted Butter 1/2 teaspooon Vanilla Extract 2 each Bananas (VERY ripe and mashed) • Set aside 1 Tablespoon of the Sugar • Combine all the dry ingredients and sift them well, and set them aside. • Combine the Egg Yolks, Melted Butter, Milk, Buttermilk, Vanilla Extract, and mashed Bananas. • Beat the Egg Whites with a pinch of Salt in a very dry and clean bowl until they form soft peaks, and gradually beat in the reserved Sugar. • Add the liquid ingredients on top of the dry ingredients as well as the Egg Whites, and fold all together well. It can be a bit lumpy when done. Do not overmix this. • Cook in a waffle iron and serve with maple syrup and butter.
This bacon is much richer and heartier than most bacon you find in your local grocery store. You can find bacon like this in great gourmet markets, or even order it online, but be prepared to pay through the nose for it.
Although I enjoyed this for breakfast, it is so flavorful I reserved it for my cooking (such as for my Scalloped Potatoes), and use regular old standard store bought bacon for most of my bacon devouring needs. About one slice of this is all I need to intensely flavor anything I cook with that delicious bacon essence. Keep it in you freezer and it will last a very long time.
I was very proud of myself for figuring out a way to naturally get to that bacon flavor, and this worked out quite nicely. I suggest you try this yourself, and let me know how it turns out.
I sometimes wonder why we settle for less than sublime in the cooking world, especially when the sublime is so easily within our reach. I watch people who buy crème fraîche, when all you need to do is add a bit of sour cream or lemon juice to heavy cream and let it sit out overnight, and what you will end up with is an absolutely wonderful crème fraîche that will cost less than any store bought crème fraîche.
The same holds true for jams and jellies, and chocolate sauce, and many other wonderful creations we can do at home. Why buy it when you can make it, and make it better?
Well, I will tell you why...it's because we are sometimes lazy, or lack confidence, or just don't have the time. We tend to live in a world where we just exchange money for what others have done, regardless of quality of the finished product. For many of us, this is an acceptable way of doing things, and I dare say that I too fall victim to this (mostly because of not having time).
However, necessity is the mother of invention, as the old saying goes, and last week I found myself in my favorite grocery store and they had no ricotta, and I wanted to make a lasagna with ricotta. My Nonna did not put ricotta in her lasagna, but I really like it in my lasagna. I was suddenly reminded of watching an episode of Top Chef where one of the chefs made ricotta on the fly, so I pulled out my trusty iPhone and looked up the recipe on line.
I have to digress for a moment here. How did I ever live without ubiquitous Internet in this world? I mean...there I was, wondering what I needed to make my own ricotta, and BAM, I found it in seconds. I gotta say I simply adore living in a connected world.
Anyway, as it turns out, the ingredients for ricotta are as basic as they come, and the technique is so ridiculously simple I feel like an idiot buying it all these years. Here is a version I came up with that was based on several recipes I saw:
Ricotta
Yield: About 2 cups finished Ricotta
1 1/2 quarts Whole Milk
2 cups Half-n-Half
1 cup Heavy Cream
1/2 teaspoon Salt
Juice of 1 small Lemon
Combine everything except the Lemon Juice in a heavy 6 quart saucepan and bring it to a rolling boil, stirring to prevent scorching.
Add the Lemon Juice and turn down the heat. Stir and simmer about 2 minutes, or until you see it curdle.
Remove the curds with a skimmer or slotted spoon to a fine strainer over a large bowl, or a colander lined with cheesecloth. Strain any remaining curds out of the whey.
Let this strain over the bowl in a refrigerator.
Do not waste the whey. Store it in a container in the refrigerator and use it as a liquid for making breads, biscuits, pancakes, or whatever else you cook with liquid in it. It has lots of protein in it.
This produces a very dry curd, which is great for lasagna. The flavor is delicious and can be enjoyed with some pepper and olive oil drizzled on it just by itself. If you prefer it a bit saltier, add more salt to the mixture when you make it.
This ricotta reminded me of the delicious ricotta I have had in Italy, and I am convinced that I should never buy that runny stuff they sell in the grocery store ever again.
There is a great satisfaction that comes to sticking it to "the man", even if it is through homemade curds.
Hey...you fight your battles, and I will fight mine!
I have to say, although my children don't know it yet, they get to live a pretty easy, if not a bit pedantic life. There were no iPads or Apple TVs or DVRs or computer games when I was growing up. Heck! We had a TV with about 10 channels on it, with some of them only coming in clearly occasionally. If you wanted to see a show, you had to be there when it was on...or you just didn't see the show.
Tough luck for me...perhaps?
Back then, I remember going to visit family in Sicily...this was about 1977, when disco was king! I was 12 years old then, and I remember flying on the plane with my Sicilian Grandparents. Back then flying was a really big deal. Nonna took me to the department store and bought me some new clothes to wear for the flight. You always dressed up for a flight back then. Everybody had a decent seat and everyone got a nice little travel bag for their flight from the travel agent, with the logo of the airline on it. Mine was a cool bag with the Alitalia logo emblazoned on it in bright green.
I was stylin'!
I remember arriving in Sicily...Palermo to be exact, to the sight of tough looking Sicilian soldiers walking around the airport with full battle fatigues and machine guns. They looked quite menacing to a 12 year old boy from Cleveland, Ohio. Despite the fact that 1977 was one of the most violent years in Cleveland mob history, with news stories nearly every day about another car bombing taking place somewhere in Cleveland, I was a bit intimidated by the machine gun toting military men in this strange new land.
It only got more interesting, and intimidating in a different way, when we drove into Palermo. There were all sorts of crazy people zipping around on their Vespa motorbikes, with little to no regard for any sort of traffic rules...and certainly not much care for pedestrians. I remember my cousins telling me to be careful when going to the large open market because there were gangs of Vespa riding thugs that would zip by you and pull gold chains off of your neck or steal purses, pick pockets...and perform all sorts of thug-like activities.
I remember going to bed that first night feeling a bit homesick. I didn't have my Etch-A-Sketch, nor my wrist radio, not any of the familiar trappings of my rather humble upbringing. The next morning did not bring me much comfort either, since nobody in Sicily seemed to have any knowledge of packaged cereal and milk, opting instead for a bowl of hot milk and coffee with an assortment of bread products to dunk in the concoction. I suddenly realized that I was going to live in this for the next two months of summer, while my brothers got to partake in Dairy Queen soft serve cones, Frosted Flakes, and machine-gun-free travel.
I sighed heavily as I watched my crusty bread pieces sink to the bottom of my breakfast bowl.
After a rather long and rather unsatisfying breakfast (I was just not ready for this change) we all piled into a FIAT that sounded like a sewing machine, and headed out for the long road trip to Lucca Sicula, the birth home of nearly my entire Sicilian family. I remember noticing the loops of rigid rubberized plastic hanging from the edges of the car ceiling, and wondering what they were for. As soon as we were out of the city, and on the rather narrow, winding, twisting country roads of the Sicilian countryside, I knew what they were for, as I watched all the passengers grab onto them and not let go for the next several hours, in order to prevent themselves from getting tossed about inside the tiny excuse for an automotive vehicle we were destined to live in for the better part of the afternoon. The roads were rather treacherous, and there did not seem to be any signs anywhere, let alone lane markers and traffic lights.
As we moved further into the country we kept having to slow down (which Italians do by slamming on the brakes, further necessitating the passenger hand holds) as we came across bands of rather salty looking countrymen with their donkeys and mules towing parcels of harvested what not and large jugs of water from the many springs along the way...which were essentially pipes jammed into the side of a mountain, spewing forth crystal clear water. The springs all had large catch basins that the mountain men would water their mules and donkeys with. Occasionally we would see one of the rugged older mountain men stripped down to his waist and giving himself an impromptu bath while his livestock drank heartily.
A Donkey Resting By The Roadside
Despite throwing up a couple of times during this road trip, I was beginning to find it all quite fascinating. The large and rugged mountains surrounded us, with the occasional house or religious institution of one sort or another majestically perched on the peaks of some of the mountains.
The animals all seemed content and a part of this rather rural, agrarian lifestyle that my ancestors had lived in for as far back as anyone could remember. Since I had spent nearly every summer growing up with my Sicilian Nonna, I spoke fluent Sicilian dialect, which allowed me to carry on a conversation as we moved further and further south, the scenery getting more beautiful with each passing kilometer.
The Beachside Town Of Siculiana
When we finally arrived in Lucca Sicula, I was very worn out from the car trip, and suffering from jet lag. We all decided to have a quick bite to eat, and then take a nap, which turned into an all night affair for me. I awoke soon after sunrise and made my way down the ancient stone stair in the stone house (old houses are not made of wood in Italy) my mother, uncles, and grandparents had all grown up in. It was a gorgeous July Summer morning, and I walked outside and made my way next door to my cousin Giuseppe's woodworking shop, where Peppino (as we all called him) greeted me warmly with a wood plane in his hand and an ever-present cigarette hanging from his jaw. Alongside him stood his young apprentice Nino (short for Antonino), who politely smiled as he steadfastly held down the gorgeous wood door that Peppi (Giuseppe's even shorter nickname) was putting the finishing touches on. I gazed at the woodworking shop in fascination, marveling at all the tools and random pieces of machinery that I had never had the opportunity to witness growing up. Peppi gave me a block of wood wrapped in sandpaper and told me to sand the door while Nino held it down, occasionally blowing off cigarette ashes that landed on the wood as Peppino barked barely comprehensible Sicilian commands to his young apprentice, who seemed to find all Peppino said and did utterly charming (as did I). We finished the door (or so I think we did), and Peppino decided it was a good time to head to the bar to get a "Tazzina d'caffè" (or cup of coffee for the uninitiated) and a "Briocha con granita", which was an eggy bun split open and filled with sweet lemon ice (granita), made in house from the locally grown and plentiful lemons. I was already liking this breakfast a lot better than my first one, and perhaps a bit more than the ones back home. As it turned out, this was a fairly common early morning respite in Lucca Sicula, and I was all over that like white on risotto!
By this point, only about an hour or two into my new career as an adopted apprentice woodworker/lemon ice loving fool, Nino and I had become fast friends. For the next several months we were always together doing something or other, and when I returned to Italy for my return visit...25 years later, Nino and I recognized each other in the town square of Lucca Sicula almost immediately. He had grown up a lot, and had a gorgeous girlfriend named Paola, but he was still the same Nino I had remembered...living in the town of about 1000 people where he had been born and raised.
Paola and Nino In Lucca Sicula
During the hottest part of the day, we worked in the wood shop, which was a good shelter from the scorching July Mediterranean sun. As the afternoon waned on, we piled into another one of those ubiquitous little FIAT cars, and headed to what would end up being my favorite place of all...the campagnia.
My Cousin Salvatore (Totti) In His Campagnia
A campagnia is a special place for all Sicilian families. Nearly everyone has at least one in their family, and they are passed down from generation to generation. They are the family plantations, generally acres in size, where life sustaining food and livestock are grown and raised. It was here that I first witnessed fresh figs, peaches, cactus pears, and plums growing profusely. It was here that I tasted my first fresh, immature almond.
Cactus Pears and Fresh Figs
It was here that rows and rows of tomatoes, and coops of chickens and rabbits surrounded a small countryside home or shelter, with an outdoor stone oven for cooking in the countryside on hot summer nights. After a late afternoon toiling in the campagnia, we would gather some ripe vegetables and take them back to the stone oven, where the Sicilian ladies of the family, young and old, had fired up the oven and were frantically kneading dough for stone oven cooked pizza and a delicious minestrone stew brimming with the flavors of the freshly picked squash, tomatoes, parsley, basil...and whatever else we could hold in our tired arms. It was here that I first truly EXPERIENCED that food was a product of the Earth, and that food was something the entire family took part in not only creating, but cooking and enjoying together. It was magical!
Top: Family At The Campagnia Bottom: Family Bottling Tomato Sauce At The Campagnia
...and it was here that I saw my first olive tree...EVER!!!
When I first saw an olive tree, or rather the hundreds of olive trees in the campagnia, I naturally had to walk up to the tree and pick an olive to eat. I mean, why not? I absolutely LOVED (and still love) olives. I reached up to a branch and picked a gorgeous green olive, and popped it in my mouth, biting into the crisp...and unbearably bitter...flesh. Peppino and Nino both laughed at my hysterically as I spit out the vile tasting fruit, admonishing me for eating an un-prepared olive. Peppi explained to me that they had to be soaked in water and salt to get rid of the bitterness for weeks before eating, and that most of these olives were going to be pressed into olive oil.
Peppino drove us to a large building strategically placed among the various family-owned campagnias, explaining to me that this was the community olive pressing mill, and that it was owned by everyone in the co-op, made up of olive growing families (which was essentially every family in Lucca Sicula). He told me that in the fall, before the first freeze hits, the campagnia owners would harvest all their olives and bring them to the community mill, where they would be weighed and then piled all together for one huge community pool of olive oil. The growers could then take home what they needed, based on what they contributed to the pool, and sell the rest to an olive oil broker, who would then sell it commercially far and wide (but mostly in Sicily, to be sure).
I thought this was supremely fascinating! I am not sure why I did at the time, but it stuck with me for decades. Every time I would eat olive oil I pictured hundreds of Sicilians, with cigarettes hanging out of their mouths, hairy armpits, and baskets of olives being poured into a mill, while they watched their precious cargo being made into what was essentially the elixir of life for these rugged agrarians. I remember going back there with my new bride, in 2002, and asking my cousins to take me to the mill, which was still there. I longed for a day when I could witness the community milling first hand, and partake of the fruit of people!
It was this, and a request from my Nonna right before she died, that led me to plant two olive trees in my own yard in Northern California. Nonna loved olives and olive oil dearly, and she wanted me to carry on the family tradition in America, and I felt this was an admirable thing to do. As much as I longed for my own campagnia in Northern California, I soon realized that acres of land here cost as much as entire cities in Sicily, so I had to settle for my backyard, where I planted an almond tree (from a seed smuggled in my fanny pack from Sicily), figs, fennel, apricots, berries, herbs, lots of other edibles...and my two olive trees.
The trees were very small when I first got them. One was a Leccino varietal, and one was a Frantoio varietal. I was told these could pollinate each other, which was essential for fruit production. I proudly planted them and watched them slowly take root and grow for several years, and after about the 3rd or fourth year I harvested the olives and decided to brine my own. It was a very laborious process...not the small harvesting I did...but the brining of the olives. It took weeks, and the olives were good, but just not worth the constant attention and daily ritual of rinsing and draining I had to go through for weeks in order to leech the bitterness out of the olives. I tried a shortcut method of soaking them in lye to neutralize the bitterness, which did indeed work, but it left my olives tasting rather bland in comparison to the old-fashioned water method. I did this one year only, and then decided to let the birds devour my crop of olives from that point forward, deciding that trips to the store olive bar were less time consuming and a great source of delicious (if not a bit costly) olives.
In the meantime I had visited many great farmer's markets throughout Northern California, and I had become a regular at my own local Livermore Farmer's Market, and had met (and eventually become well acquainted with) the Crohare family, who sold their locally grown and pressed Olivina brand California Extra Virgin Olive Oilto market visitors. I can remember this being the first (of many to come) Certified California Extra Virgin olive oil I had ever tasted, and I immediately fell in love with the wonderfully fragrant, bright, peppery, and eminently fruity flavor. It was from that moment forward that I vowed to make this locally produced olive oil a staple in my kitchen, and today it is the only olive oil I purchase (but not the only olive oil I consume...more on that later).
The Old Olivina Ranch Gateway - Now Part Of A Public Park and Vineyard Entrance
Eventually I made my way over to The Olivina, nestled among vineyards in the Livermore countryside, and wrote a story about this long-established Northern California producer of premium olive oil. Charles Crohare Junior and Charles Crohare Senior both live there and run the orchard and in-house harvesting, milling, packaging, and shipping operation. Both of the Charles' were very cordial, and loved to explain what they did and loved...which was anything to do with olive oil. They had finished all milling at this point (it was early spring, and milling happens in the fall). It was the following year, if I recall correctly, when Charles Jr. told me I could come by and watch the harvest and milling, if I promised to be careful. Having been an chef at one point, I had learned how to behave around machinery in the food service industry, and Charles obviously knew that I would love to see it happen, and could be, hopefully, trusted around the process.
I remember going there my first time, and watching the olives get milled, then the oil being separated from the mashed olives, and finally emerging in a wonderful green and golden stream at the end of the process.
I tasted this freshly pressed olive oil and was immediately blown away by it. I had never tasted anything that even remotely tasted like this. It was unfiltered and unsettled olive oil, known as "Olio Nuovo" in Italy, which was still cloudy with microscopic particle of olive pulp, much like the pulp in freshly squeezed orange juice, but much smaller in size. Like freshly squeezed orange juice, it had a remarkably bright, fragrant, and intensely fruity flavor, with loads of peppery pungency tickling the back of my throat as I savored this most prized of all olive oil products. I just knew I had to have some of this, and convinced Charles to sell me a few bottles of this delicious treat, which he now sells for limited time through his website, for the short time it is available. The intense fruity freshness dissipates after a month or two in the bottle, so getting this early is essential to maximum enjoyment.
I remember talking to Charles about the community milling they did in Sicily, and he told me that he did indeed mill olives for other local growers, for a modest fee, but had not yet done a community milling for small, personal growers (like me). I really wanted my olives to be pressed into olive oil, and felt like a total heel for letting them turn into winter bird feed, but Charles told me that the minimum amount needed to run the press was around 500 lbs., which my two trees did not come close to producing.
...then one year, it happened.
I can't remember where I first heard it, but I found out that Olivina was going to have a community pressing for any and all growers to bring their olives to (no matter how big or small your crop), and for a modest fee, Olivina would throw all your olives together in a big community pile. It was the end of the Indian Summer in Northern California, and I was staring at the absolute most gigantic crop of olives I had ever seen on my trees. THEY WERE EVERYWHERE! I marked the date off in my calendar (November 11, 2012), and waited anxiously for the day to come. I was going to not only get to witness a community olive oil pressing, but was also going to partake in the entire process, from harvest to final product!
November 10th finally came around, and I gathered my reluctant family together to help harvest my olives. The children were happily playing with their iPads and computer games, or otherwise being rather laid back and unproductive (which is fine with me most of the time), so I made them drop their electronics, grab a basket, and started picking and gathering olives. First of all, I had to cut the massive branches off of the trees, which had now grown to about 20 feet in height, and then they all got down on their hands and knees and began gathering, sorting, and bagging olives.
You can be sure that I had to deal with a lot of moaning and wailing...for 8 hours. Yes, it took us 8 hours to pick and sort them all (getting rid of the leaves and rotten or bug infested olives), and my hands were raw, and we were all exhausted. Nonetheless, we all spent time together, as a family, partaking in a ritual my ancestors (and existing family in Sicily) had gone through many times before. It was time to harvest the olives, and all hands were on deck...like it or not!
Sorted Olives
My Baby Girl Watching Over Community Olives
We ended up picking 116 lbs. of olives (although I swear it felt like 200 lbs. at least), leaving probably close to 40 lbs. behind because the sun was going down and it was getting cold outside. We brought them to Olivina early the next morning, and were the first to arrive. Charles Jr. and Sr. were both there to greet us, and they then carefully weighed our olives and dumped them in a bin with other Italian cultivars, because they wanted to keep the various cultivars separated by similar features (e.g. varietals for large crops and nationality of cultivars for smaller crops). We then left and I returned later to film the milling, and got to collect 2 gallons of community olive oil that included my very own olives in the mix. Woohoo!
So how is the olive oil, you may ask? It is absolutely delicious, and it is what I am now consuming (along with the Olivina brand olive oil I always have on hand). I transferred it to empty, clean Olivina bottles I have collected over the years (obviously perfect for this), and will likely give some away as Christmas presents to those lucky enough to make it on my list :-)
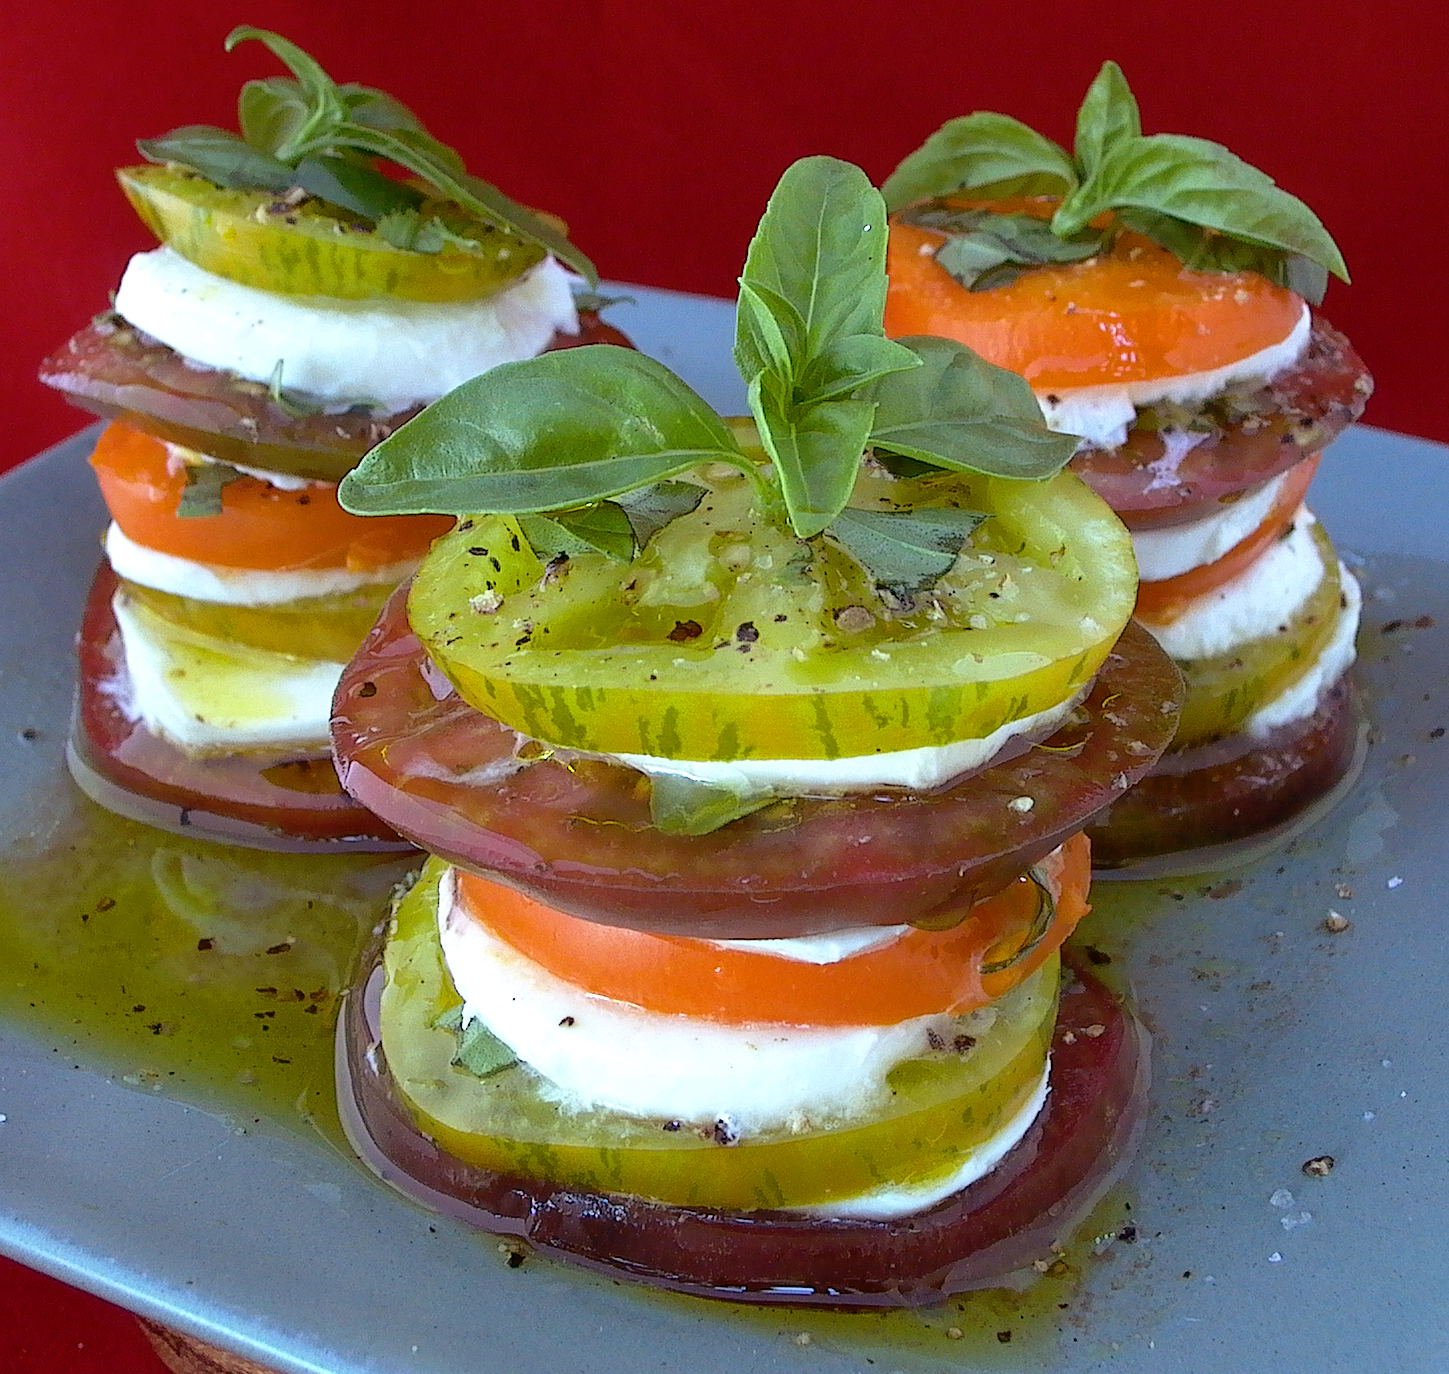
It is absolutely delicious drizzled on just about any food you like, and I think it is particularly delicious drizzled over stacked tomatoes and fresh mozzarella, or freshly steamed vegetables, such as asparagus.
More importantly to me, however, is not the delicious olive oil. What matters to me the most is the amazingly clear memories this community pressing evoked in me, and the fact that I was able to close the loop on something that became a part of my consciousness over 30 years ago, during that wonderful trip to Italy, where I first became aware of REAL community, both in family, and with neighbors and complete strangers. I am happy to be blessed with the ability to impart this to my children, and be a part of any effort to bring people together for worthy causes, even if it is simply to press olives. It really meant a lot to me, and I filmed the entire wonderful event for all to see. Please enjoy this (long) and complete record of my experience:
Thank you Olivina, perhaps now you know how much this really means to me, and perhaps others you serve with this wonderful event!
I am republishing this at the request of a fan of my former blog site. When Apple, in their infinite wisdom, decided to end iWeb and MobileMe websites, out went my blog. Fortunately, I copied all the posting contents into my awesome MacGourmet program, so I still have all the content. It will take me a while, but I will get it all back up here for my adoring fans :-) (and thank you for the adoration, it means a lot to me).
Anyone who lives in a place where grapes like to grow soon discovers that grape vines like to produce lots of grapes. Let me say that again...grape vines like to produce LOTS OF GRAPES. Given the right conditions, grapes are one of the most tenacious vines you will ever encounter. All they need is a little water and some heat and sunlight, and they just grow and grow. My first (and still current) home had a wonderful trellis over the backyard deck, so I decided it was appropriate to plant some grape vines that could then climb and create some wonderful shade, which they have done marvelously. I planted some Sauvignon Blanc, Zinfandel, and Cabernet Sauvignon vines. It was not long before I realized that I would end up with more grapes than I could ever imagine.
These varietals, as you perhaps know, are wine grapes. I am truly a lover of fine wine, and it was for this very reason I decided not to make wine. I am quite certain that it would be fun to do, and I am sure I will give it a try...someday. For now, I think I will trust the making of wine to the many wonderful winemakers scattered within anywhere from 3 to 40 miles away from my house, or even further than that, thanks to the availability at my local wine merchants. I decided instead it was best for me to dabble in the fine art of preserve making. After all, homemade preserves make wonderful Christmas gifts, and my family just loves peanut butter and jelly sandwiches. Yes, preserves it had to be.
The good old fashioned American Concord grape is, by far, the most popular grape jelly grape in the United States. Every child in America is familiar with the deep purple goodness this grape has delivered to many a PB&J or slice of toasted Wonder Bread in the form of Welch’s (and other) Grape Jelly. I have had the pleasure of making some grape jelly from this wonderful varietal, and it was every bit as good as (if not better than) the store bought grape jelly of my youth.
Some may ask “But isn’t homemade always better?” and my answer to that is a resounding “NO”. Homemade is better for most foods, but it is not generally better when you have a food “memory”. McDonald’s does not make what I would consider a good hamburger, but they make the BEST “McDonald’s Food” I have ever tasted. I mean really...take a deliciously prepared hamburger grilled on your outdoor grill and compare it to a Quarter Pounder and you will quickly see the difference (as if you must do this to know the difference). Now, I do not frequent McDonald’s, but when I want that taste borne of the years of childhood food memories, there simply is no substitute. The same goes for cheapo yellow mustard on a hot dog, American Cheese on a grilled cheese sandwich, and grape jelly. I expect it to taste a certain way, and my homemade concord grape jelly tasted like the real thing. What is even more amazing is that my lovely wife, Becky, who is a bonafide PB&J junkie thought so as well, and made short work out of devouring my stash. Oh well ! I made it for her anyway.
This takes me to my wine grapes. While the concord is ideal for grape jelly, wine grapes are ideal for wine. Does this mean that wine grapes cannot make good preserves ? Absolutely not ! Wine grapes make absolutely FANTASTIC preserves, but you have to understand when and how in order to achieve success. Wine grapes generally are intensely flavored (a very good thing), and when fully ripened are ridiculously high in sugar and low in acid. They are indeed pleasant to taste at this point, but you will soon grow tired of the cloying sweetness of ripe wine grapes (yes, they are THAT sweet). The concern with using fully ripened wine grapes for preserves, however, is that in order for proper setting to occur with pectin, you need a correct balance of pectin, sugar, and acid. Fully ripened grapes are too low in acid to guarantee a good set, as well as being too high in sugar. When you purchase pectin at your local grocery store (I use MCP or SureGel) the instructions for grape preserves are generally balanced for concord grapes. It is therefore important to try to strike a balance with wine grapes that closely resembles the concord grape profile.
Ingredients If Using MCP Pectin: 5 cups Grape Juice or Juice and Pulp (about 6 lb. grapes) Juice of 1 Fresh Lemon 1 box MCP Pectin 5 1/3 cups Sugar If Using Sure Jell Pectin: 6 1/2 cups Grape Juice or Juice and Pulp (about 7 lb. grapes) Juice of 1 Fresh Lemon 1 box Sure Jell Pectin 7 cups Sugar
Method 1. Prepping Canning Materials Clean and sterilize 8 - 8 oz. canning jars and bands. Wash canning lids in soap and hot water. The best way to sterilize the jars is to wash them in a dishwasher and leave them in there until ready to can (the heat from the dishwasher will sterilize them). The best way to sterilize the bands is to boil them in water. Turn off the heat and when the boiling stops you can drop the washed lids in with the bands, but do not boil the lids. You should also wash a pair of kitchen tongs or a magnetic lid lifter as well, and place them in the boiled water with the bands and lids, with enough sticking out of the pot so you can easily remove it. You do not want to touch anything with your hands that will be in contact with the jar contents once they are sterilized. 2. Sourcing Grapes So what does this all mean ? How do I know when the grapes are right for preserving ? I simply taste them. As the grapes ripen they will go from tannic and sour to sweet and tasty. The sweetness continues to build as time goes on. I pick them for preserving when they resemble table grapes in sweetness. No rocket science is needed for this, just taste the grapes. There should be a bit of acidity in the flavor profile, and tannins should be a bit tame. At this point you generally have a few weeks where the grapes are good for preserving, so if you want to spread the chore over a few weekends (as I did), rest assured that you will be okay. If you have several varietals of grapes (as I do) you can either combine them into a “Meritage Blend” of sorts, or make a preserve for each individual flavor. They are your grapes, so the choice is yours. The resulting preserves will be delicious either way. I chose to make a clear grape jelly from the Sauvignon Blanc grapes, which resulted in a gorgeous jelly with the color of fine champagne. I chose to turn the Zinfandel and Cabernet into individual grape jams, and then I took all three and made a “Meritage” grape jam. All turned out fantastic! 3. Prepping Grapes After picking my grapes I put them in a sink of cold water and washed they very well. You may wish to rinse them off with a hose while outside before this step, as there are going to be lots of little insects and spiders to contend with. After a thorough washing I removed the grapes from the stems and put them in a large bowl and crushed them all by hand. You can also use a potato masher for this, but do not use a blender or food processor. You do not really want to mince up seeds for your preserves, as the seeds tend to be tannic and can throw off your flavors. Just crush them. After they are crushed put them in a pot and bring them to a gentle boil, skimming off any foam that collects at the top. I like to add a pinch of sea salt at this point. Boil the grapes for no more than 10 minutes. You want to extract some of the tannins from the skins and seeds, as well as the color from the skins. After the 10 minutes are up, turn off the heat and let the grapes cool to room temperature. During this time the color will extract from the skins and deepen the color of the juice and pulp. Once the grapes are at room temperature, you will want to strain out the seeds and skins.
If making jelly you will also want to strain out the pulp. Let’s talk about the differences. The difference between jam and jelly is the presence of or absence of pulp. Jam contains the juice and pulp and jelly contains only juice. For a light colored (white) grape I like to make jelly, as I like the clarity. To accomplish this I strain the grapes through a fine sieve and then let the juice sit in the refrigerator overnight to allow the solids from the grape juice to settle. I carefully pour the clear juice off the top of the vessel, reserving it for my jelly, and discard the cloudy sediment. For a dark colored grape, I do not bother with this step, and opt instead to get as much pulp as I can by passing the grapes through my hand cranked food mill, discarding the seeds and skins to the compost heap. At this point, you are ready to make your preserves. You will need some pectin, sugar, and lemons, as well as some canning jars. Please refer to my posting on preserving tomatoes for guidance about canning jars. Generally, you will need approximately 1 or 2 lemons, 4-5 cups of sugar, and a quart of grape juice or juice and pulp per box of either MCP or SureGel pectin. You can use any pectin you like, just make sure you follow the directions for amounts that come with the pectin. Nearly all the recipes I have used call for the addition of water to my grape juice and pulp, but I opt to use more grape juice instead, and have never had a problem. The lemons will be used for lemon juice, which is required for acidity in the recipe. Follow the recipe on the package (with my substitutions if you wish) and you will get a good set. DO NOT cut back on what will appear to you as an enormous amount of sugar. 4. Stir the Pectin into the Juice (or Juice and Pulp) with the Lemon Juice until completely dissolved. 5. Bring this to a rolling boil while stirring. 6. Add all the Sugar at once and stir in until completely dissolved. 7. Bring back to a full rolling boil and cook exactly 2 minutes. 8. Canning Fill sterilized jars to within an inch from the top and then top with a lid and band. I use a magnetic lid lifter to lift the bands and lids out of the sterilized water bath, and a canning funnel to get the contents in the jar without spillage. 9. Sterilizing Filled Jars Boil the jars in a pot of water that has some paper towels in the bottom (or a cloth towel) to prevent the jars from cracking. Make sure you have enough water to completely cover the jars. Boil for 10 minutes, and then let the jars cool in the water a bit to make them easier to remove. You can remove the jars with a jar lifter, but I use kitchen thongs. 10. The jars should form a vacuum and seal. Do not re-tighten the bands, as this may break the seal. The center of the band should snap down when the seal is complete. If you have a jar or two that does not snap down, simply refrigerate those jars and use them first. They will keep for months in the refrigerator. 11. Sealed jars can be stored in a cool and dark place for years (although they do not last for years at my house). Make sure you label the jars with the contents and date.
Cutting back on sugar is a sure guarantee that your preserves will not set. Once your preserves are cooked, it is time to can them, and this needs to be done while the cooked mixture is still liquid. Ladle the cooked preserves into the jars and seal them using the method outlined in my preserving tomatoes blog entry. Properly canned preserves will keep for years. Make sure to label the jars with the contents and canning date. You will probably have a lot of preserves, so give some away as Christmas gifts. Your friends and family will love you for it.
As for the rest of the grapes, thank God the birds love them.
Enjoy in good health !
I have often felt little twinges of jealousy when watching my Mexican friends eat jalapeño peppers. I mean, for God’s sake, those guys can put away A LOT of jalapeño peppers, and without breaking a sweat. I get an upset stomach just watching them do it.
The truth is, I love jalapeño peppers. They are absolutely delicious, and, like many peppers, they have a unique flavor profile. I simply cannot tolerate the heat of more than a few of these in my dishes, and my family tolerates even less than I can. I can remember going to the farmer’s market and buying a small package of these delicious peppers, only to have them spoil before I could consume them all.
It was just too much for my frugal heart to bear, and I decided that I should instead grow my own, and then I would have a nice supply on hand without having to waste those I did not eat.
A lot of good that did me ! As it turned out, my first attempt at growing jalapeño peppers was a disaster. Not because they would not grow, but because they went ballistic, and I ended up with about 5 pounds of peppers on my first harvest. There I was again, staring at more jalapeños than I would ever use in a year. I had to think fast.
...and then it came to me.
I decided that I was going to smoke them (not like tobacco...the other way), and then they would be preserved for whatever I wanted to use them for. It was a stroke of genius, I tell you...I was inspired.
Let’s talk about smoked jalapeño peppers for a moment. Smoking jalapeños is actually quite common. The resulting product is referred to as a chipotle pepper, and they are a mainstay of Mexican and Southwestern cuisine. Chipotle peppers are made by smoking very ripe jalapeños (bright red) until they shrivel up like raisins and turn nearly black in color. The process dries them out, and they can then be stored at room temperature for a very long time. I opted NOT to use this method, because my jalapeños were not ripe, but bright green. I wanted to preserve them a bit, but did not want the somewhat pungent smokiness to overpower the “green” flavor of the unripe jalapeño. I formulated my plan.
I did not have a smoker at the time (I do now), so I decided to create a makeshift smoker using my gas grill and some wood chips and aluminum foil. I simply fired up one side of my grill (leaving the other side cool) and soaked some wood chips (which I bought at the local home improvement store, in the barbeque department) in water, then wrapped them in a layer of aluminum foil. I poked holes in the foil pouch of wood chips, and set it on the lit side of the grill.
I carefully laid my jalapeños out on the grates on the other side of the grill, turned the heat down to as low as it would go, and then covered the grill. After a while the heat under the foil pouch of wood chips made them smolder, and the inside of the grill was soon filled with smoke. I let these smoke for about 3 hours, turning the peppers frequently, until they were shriveled up but not quite black (there was still a bit of green showing). I removed them from the grill and spread them out in some baskets in a single layer and let them dry in the sun for several days, until they felt a bit like dried apricots. They were ready to go.
At this point, I packed them into Ziplock freezer bags and froze them, but not before setting some aside to make what is now my soon-to-be-famous Smoked Jalapeño Barbeque Sauce. Here is how it all came together:
Ingredients:
20 each Smoked Jalapeño or Chipotle Peppers, entire fruit 16 ounces Cider Vinegar 12 ounces Amber Ale 6 ounces Tomato Paste 5 each Tomatoes 2 each Onions, fresh 3 cloves Garlic 2 tablespoons Onion, minced, dried 4 sprigs Thyme ½ cup Brown Sugar 16 ounces Molasses, full flavor 1 teaspoon Black Pepper 1 Tablespoon Dry Mustard 2 teaspoons Cumin 2 teaspoons Paprika 1 teaspoon Seasoned Salt 3 Tablespoons Worchestershire Sauce 3 Tablespoons Teriyaki Sauce Instructions:
1. Peel and coarsely chop the Onions and Garlic. 2. Combine all ingredients and simmer on very low heat for 3-4 hours. 3. Let cool and then puree using an immersion blender or in a standard blender. 4. Strain and refrigerate.
This sauce is absolutely delicious served as a side sauce for barbeque ribs, chicken, beef, pulled pork, or whatever else you want to barbeque. I have to warn you it is a bit hot (smoking jalapenos intensifies the heat), but you will still find yourself licking it off of your fingers, because it is very tasty. I have kept this in a refrigerator for over a year and it not only remained delicious, I believe the aging mellows it into an even more delicious sauce than when it is first made.
For an extra delicious treat, try adding some raspberry jam to the sauce and serving it with a barbeque leg of lamb, paired with an intense Australian Shiraz. Outstanding !!!
As for the rest of the smoked jalapeños, I pull some out every so often when I cook Southwestern or Mexican food, and use them for a smoky and hot flavor burst.
In the United States we are often known for culinary contributions of dubious distinction. Deep fried macaroni and cheese can be spotted on a menu along with the glorious juicy burger. The juicy burger must share its place with the aspirin sized pseudo-burgers found in our favorite fast food establishments. At least one fast food establishment (yes, I mean McDonald’s) is both home to the aspirin sized burger and the most delicious fries I have ever tasted. I mean, c’mon, can anyone tell me they have truly had a fry that is even in the same league ? If you have, can you consistently get it in any of 15 to 20 locations within an hour drive from your home ? Let’s give credit where credit is due !
Yes, we Americans have contributed our share of entries into the world of food, and some regions are just known as the quintessential home of many of these foods. New England has its Lobster Rolls. New Orleans has its Red Beans and Rice. California has its Duck Pizza. None of these, however, puts me in a region of this magnificent nation we live in quite like the Southern Buttermilk Biscuit. To me, a good old American biscuit just screams “The South” like nothing else does. Slathered with butter and jam, covered in an artery clogging sausage flavored goop, or housing delicate slices of delicious Kurobuta Ham...it does not matter to me. This regal king of quick-breads belongs to the states south of the Mason-Dixon line. God Bless America !!!!
There was a time in America where you had to travel to “The South” to get a decent biscuit. Sure, you could get a scone in a fancy hotel or tea room, and scones are indeed the great grandaddy of all biscuits, but the difference between a scone and a biscuit is like the difference between meat loaf and meat terrine. Sure, they are essentially the same thing, but they are also quite different, and that is why they continue to exist in two separate worlds.
Biscuits, however, have made it onto nearly every breakfast menu found in the USA, as well as onto eclectic catering menus and into our kitchens. With the introduction of Bisquick in the grocery store, the fine art of biscuit making has been transformed to a “just add water” event, and the biscuits are actually not bad ! I, however, am not satisfied with food that is merely “not bad”. I have this obsession with finding the best, and will stop at nothing until I do. So my quest for the perfect biscuit led me to countless years of experimentation until one day I stumbled upon an absolutely fantastic recipe at the “Cooks Illustrated” website. I decided to give it a try, and there it was...THE PERFECT BISCUIT !!!
...with a little modification, of course.
Of course I had to modify it to my taste! I altered the fats a bit, because their recipe called for shortening (perish the thought!), and I prefer my technique. I feel I can safely call this my own recipe (but I give credit where it is due).
I must first take a moment to describe what I mean by “Perfect Biscuit”. Perfectly prepared biscuits must be very light in texture, must melt in your mouth (yet not crumble when you try to make a little sandwich with one), and must be so delicious you simply cannot eat just one. They must also look so appetizing you begin drooling the moment you set eyes on them, much like an ex-convict who is taken to a burlesque show does...well, you know what I mean. They must immediately come to mind every time you think of biscuits, see biscuits, or see pictures of plantation owners in white hats. Anything else just will not cut it.
Now that I have hopefully peaked your curiosity, I am going to tell you how to make these wonderful pillows of gravy sopping ecstasy. Read on.
Lets start with the ingredient list. For a dozen biscuits, about the width of the rim of a drinking glass, you will need the following ingredients:
Perfect Biscuits Yield: 12 Biscuits
2 cups Unbleached All-Purpose Flour (I like King Arthur, available at Trader Joe’s) or 50/50 All-Purpose and Whole Wheat Flour 1 Tablespoon Baking Powder ½ teaspoon Baking Soda 1 Tablespoon Granulated Sugar 1 teaspoon Salt (I do not use iodized salt) 2 Tablespoon Unsalted Butter (chilled and cubed) 2 Tablespoons Lard or Bacon Fat (chilled and cubed) 1½ cup Buttermilk (chilled)
Let me discuss the ingredients for a moment. I use Unbleached Flour because bleaching flour changes both the taste and texture of the flour, and since biscuits are little more than fat and flour we want to retain as much character as we can. You can also use a 50/50 blend of whole wheat and white flour if you want a slightly wheaten biscuit. You will need some extra flour for the biscuit preparation surface as well.
I do not use iodized salt because I can taste the iodine, and it is not pleasant. I like using plain sea salt.
Then there is the fat. Some of you may decide to use margarine and shortening instead of Butter and Lard or Bacon Fat (Bacon Fat and Lard are essentially the same thing). Do not do it !!! Butter and Lard not only contribute fantastic flavor to the biscuits, but the texture is completely different. Both Butter and Lard melt at body temperature, giving you that melt in the mouth feeling you simply love. Margarine and shortening, on the other hand, do not fully melt at mouth temperatures. They essentially soften and coat the mouth with a film of fat. Side by side, you can immediately tell the difference. For the health conscious out there, remember that Butter and Lard or Bacon Fat are natural products, and margarine/shortening are not. There was a time when we all believed manmade fat products were better for us, and science has now decided they are not. I am a firm believer that, in moderation, we are better off eating fats that God has given us.
But I digress...we are trying to make PERFECT BISCUITS, and for that you need Butter and what the hog has given us. Now that we have that clarified all that, lets move on to the steps:
1. Preheat oven to 500° F and set oven rack to the center of the oven.
2. Combine dry ingredients in a food processor and pulse to blend. Add chilled Butter and Lard and pulse until the the mixture looks pebbly (do not over mix).
Dry Ingredients With Butter and Lard in Food Processor
Pulsed Mixture
3. Remove from the food processor and put this mixture in a bowl and gently stir in the Buttermilk (I use a fork) until just incorporated. The dough will be very wet and sticky at this point.
4. Turn onto a generously floured board and generously flour the top, and fold over, flour, pat, fold, flour until workable but still a little tacky. This should take about 5 folds. Try not to add too much flour, as that will toughen the biscuits, and do not knead the dough, which would also toughen the biscuits. Simply fold and pat out flat. The final pat before cutting should leave your biscuit dough about 1/3 inch to 1/2 inch thick.
Wet Biscuit Dough On Floured Board
Flattened Biscuit Dough
Folded Biscuit Dough
5. Cut biscuits using a floured biscuit cutter or the floured rim of a drinking glass and put them on a baking pan prepared with a baking sheet or lightly greased or sprayed with nonstick coating, with the sides just kissing each other.
Cutting Biscuits
Panned Biscuits
6. Put them in the oven, close the oven door, and turn the temperature down to 450° F. Bake for 10-12 minutes. If you have a convection oven, use the convection fan and cut the baking time down to 9-11 minutes. The circulating air will create a taller and more evenly baked biscuit. The tops of your biscuits should be a lovely brown, and the sides will be considerably lighter. Remove these from the oven and serve them immediately.
Biscuit making is as much technique as it is ingredients, so let me give you some valuable pointers. Make sure the initial oven temperature is fully at 500 degrees Fahrenheit. You need the initial heat blast to get the gases moving the biscuits up before the dough cooks, otherwise you will end up with a dense biscuit which will resemble a hockey puck in taste and texture. Make sure your fat and Buttermilk are as cold as possible for as long as possible. You do not want the fat to become fully homogeneous with the dough. Rather, you want a suspension of small fat particles dispersed throughout the dough, which will create flakes and pockets of lightness when the biscuits bake. You want to avoid creating as much gluten as possible with biscuits. Gluten is the protein part of the flour which, when combined with water and physically worked, creates that unique stretchiness found in bread doughs. With a bread dough, you want gluten because you need to trap as much CO2 from the yeast as possible for as long as possible as you condition the dough (that is what you do when you let it rest and rise). The yeast based conditioning and gluten give yeast breads the wonderful chewy texture we love about bread. Biscuits do not go through any conditioning. Once the Baking Powder and Baking Soda have release their gases, it is over. We do not want chewiness in our biscuits. We want enough firmness to bite through, and then we want them to melt away on our palates. Once I have added the Buttermilk to the dry mix, I mix only to combine, and then I like to dump this mixture onto a generously floured (you want a solid 1/4 inch layer of flour on the surface) flexible plastic cutting board. I then generously flour the top of the dough and pat it flat, and use the flexible cutting board to help me fold the dough. Each fold gets as little flour added to it, which helps create a layered effect in the biscuits. Once I have cut my biscuits (cut them as close to each other as you can) I gently reform the scraps and flatten the dough out again (avoid using flour at this point) and cut some additional biscuits. Re-forming the dough once is okay if you initially do not overwork the dough. Re-forming too many times will make the biscuits from the re-formed dough tough.
Some recipes call for brushing the tops of biscuits with molten fat before baking. You can do this if you wish, but I do not. You can, if you wish, add additional ingredients to your biscuit dough. My favorite add-in is cheese and green onions (biscuits pictured above). Chop 2 green onions (scallions) and 2 leaves of fresh sage or any other herb you like (optional) and add this to the initial dry mix along with 1/3 to 1/2 cup shredded cheese. Prepare as above. These are especially delicious served with baked ham or sausage gravy.
Green Onion and Sage Biscuits
Sausage Gravy
Yield: 1 1/2 cups
Note: This can be frozen and then reheated.
8 oz. Breakfast Sausage (bulk, not links)
1/2 (approximately 1/4 cup) Chopped Onion
1/2 teaspoon Freshly Ground Pepper
Pinch of Garlic Powder
1 leaf Fresh Sage (chopped) or 1/2 teaspoon Dried Sage
4 teaspoons Flour
1 1/4 cups Milk
Salt to taste
Brown the Sausage in a small saucepan while breaking it up as it cooks
Add the Onion, Pepper, Garlic Powder, and Sage and cook until the Onions are lightly browned. DO NOT drain off the fat.
Add the Flour and cook until the Flour is absorbed.
Add the Milk and stir over medium heat until the mixture thickens and boils. If it is too thick, add a little more Milk.
Serve immediately over fresh biscuits, or as a side gravy with breakfast items.
Once you have made your own Perfect Biscuits, you will want to do it again and again, and you will get better at it the more you practice.